By Toxic Frog
Editor's Note[]
While this guide certainly has some good information, OCR is error prone and a lot of work. For the vast majority of games, you can find transcriptions or text rips online if you search around or ask the right people, so try that first.
That said, here is the guide in case you actually need to do it:
Using gOCR and ImageMagick to automatically transcribe text from screenshots[]
A few days ago, faced with the depressing prospect of transcribing dialogue from 450+ screenshots by hand, I decided to see if I could use ![]() to solve this. The results were far better than I expected, so I decided to write up a guide in the hopes that other people will find it useful - especially people working on text-heavy SSLPs.
Required: the ImageMagick image processing toolset (in particular the "convert" tool); the gOCR optical character recognition tool; and some degree of comfort with the command line. This writeup assumes Linux, but will probably work as-written on OSX and windows, too.
to solve this. The results were far better than I expected, so I decided to write up a guide in the hopes that other people will find it useful - especially people working on text-heavy SSLPs.
Required: the ImageMagick image processing toolset (in particular the "convert" tool); the gOCR optical character recognition tool; and some degree of comfort with the command line. This writeup assumes Linux, but will probably work as-written on OSX and windows, too.
Step 1: Cropping out the text[]
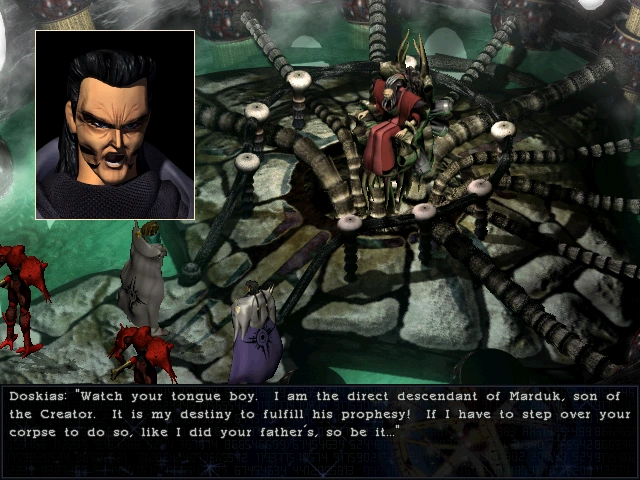
Let's use this screenshot from Septerra Core as our example.
Trimming out the text here is easy; SC always puts it in the same place. The box at the bottom is 640px wide and 96px high, with its upper left corner at (0,384). We can easily crop that out with imagemagick:
convert -crop 640x96+0+384 original.png cropped.png
Step 2: Cleaning up the text[]

Now we have the text neatly separated from the rest of the image, but there's two problems with it. First of all, gOCR expects to find dark text on a light background. That's easy enough to fix.
convert -negate cropped.png negated.png

However, the faint border and the patterns in the background may still distract the OCR program. Ideally, we want the text to be pure black on a pure white background, with each letter occupying a distinct - and consistent - group of pixels.
Fortunately, ImageMagick lets us to do exactly that; the -threshold % option will map everything brighter than the given value to white, and everything else to black.
convert -threshold 50% negated.png leveled.png

50% is a good starting value, and in this case it's exactly what we wanted - the text is now clear black against a white background.
We can actually do this all in one command:
convert -crop 640x96+0+384 -negate -threshold 50% original.png text.pnm
Note the PNM extension - gOCR's PNG support depends on having other tools installed, but PNM support is built in.
Step 3: Extracting the text[]
gOCR's text recognition often gets things wrong, at least on this font; it tends to render f as E, among other things. Fortunately, we don't have to use it, because gOCR has a database feature: it looks up each pattern in a database, and if it doesn't find it, it asks you what the pattern should be and stores it.
In this case, the command we want is:
gocr -d 0 -a 99 -f UTF8 -m 386 -p ocr/ -i text.pnm
Let's break it down:
- -d 0: disable despeckling. There are no specks left thanks to our preprocessing with imagemagick, and we don't want it to accidentally remove a period or something.
- -a 99: require confidence of at least 99% in detection. If you set it to less, it'll mix up things that differ only by a single pixel like I and l; if you set it to 100, however, it'll ask you for every single character, even ones it's see before.
- -f UTF8: output UTF-8 text. It also supports ASCII and a few others.
- -m 386: mode 386, which is the sum of: mode 2, use the database to recognize characters; mode 128, ask the user for unrecognized characters and save them to the database; and mode 256, disable the normal text recognizer. This makes it work entirely from the database and your teachings rather than using its normal text recognition.
- -p ocr/: Load/store the database from the directory ocr/. This directory must exist before you run gOCR; it won't be automatically created. You also need the trailing / or it will get confused.
- -i text.pnm: Use text.pnm as the input image.
When we run it, it'll present us with something like this:
,,,,,,,,,,,,,,,,,,,,,,,,,,,,,,,,,,,,,,,,,,,
,,,,,,,,,,,,,,,,,,,,,,,,,,,,,,,,,,,,,,,,,,,
,,,,,,,,,,#####...,,,,,,,,,,,,,,,,,,OO,,,,,<-
,,,,,,,,,,.#...##.,,,,,,,,,,,,,,,,,,,O,,,,,
,,,,,,,,,,.#....##,,,,OOO,,,,,OOOO,,,O,,OO,<
,,,,,,,,,,.#.....#,,OO,,,OO,,O,,,O,,,O,O,,,
,,,,,,,,,,.#.....#,,O,,,,,O,,,O,,,,,,OOOO,,
,,,,,,,,,,.#.....#,,O,,,,,O,,,,OOO,,,O,,O,,
,,,,,,,,,,.#....#.,,OO,,,OO,,O,,,O,,,O,,OO,
,,,,,,,,,,######..,,,,OOO,,,,OOOO,,,OOO,,OO<-
,,,,,,,,,,,,,,,,,,,,,,,,,,,,,,,,,,,,,,,,,,,
,,,,,,,,,,,,,,,,,,,,,,,,,,,,,,,,,,,,,,,,,,,<
The upper pattern was not recognized.
Enter correct UTF-8 char or string for it:
Enter D, of course, and when it asks where to store it to, enter 2 to select the database. As it runs, it'll repeat this for each new character it sees.
Occasionally, it'll get slightly confused and merge two characters into one; in that case just enter both characters and it'll do the right thing:
,,,,,,,,,,,,,,,,,,,,,,,,,,,,,,,,,,,,,,,,,,,,,,,,,,,,,,,,,,
,,,,,,,,,,,,,,,,,,,,,,,,,,,,,,,,,,,,,,,,,,,,,,,,,,,,,,,,,,
,,,,,,,,,,,,,,,,,,,,,,,,,.......#,,,,,,,,,,,,,,,,,,,,,,,,, -
,,,,,,,,,,,,,,,,,,,,,,,,,......#.,,,,,,,,,,,,,,,,,,,,,,,,,
,,,,,,,,,,,,,,,,,,,,,,,,,........,,,,,,,,,,,,,,,,,,,,,,,,,
,,,O,,,,OO,,,,,,,,,,,,,,,........,,,,,,,,,,,,,,,,,,,,,,,,,<
,,,O,,,,,O,,,,,,,,,,,,,,,........,,,,,,,,,,,,,,,,,,,,,,,,,
,,,OO,,,,O,OOO,,,,OOOO,,,##.#....,,,OOOO,,,,,,,,,,,,,,,OOO<
,,OO,,,,,OO,,O,,,O,,,OO,,.##.....,,O,,,O,,,,,,,,,,,,,,O,,,
,,,O,,,,,O,,,O,,,OOOO,,,,.#......,,,O,,,,,,,,,,,,,,,,,,O,,
,,,O,,,,,O,,,O,,,O,,,,,,,.#......,,,,OOO,,,,,,,,,,,,,,,,OO
,,,O,,,,,O,,,O,,,,O,,,O,,.#......,,O,,,O,,,,,,,,,,,,,,O,,,
,,,OOO,,OOO,OOO,,,,OOOO,,###.....,,OOOO,,,,O,,,,,,,,,,OOOO<-
,,,,,,,,,,,,,,,,,,,,,,,,,,,,,,,,,,,,,,,,,,O,,,,,,,,,,,,,,,
,,,,,,,,,,,,,,,,,,,,,,,,,,,,,,,,,,,,,,,,,,,,,,,,,,,,,,,,,,<
The upper pattern was not recognized.
Enter correct UTF-8 char or string for it: r'
Store the pattern? 0=no 1=into_memory 2=to_database: 2
When it's done, it'll spit out the text. Furthermore, if you did everything right, it'll have stored the letters it learned in ocr/, and by feeding it the same directory on future runs, it'll use the learned patterns without needing to ask you:
$ gocr -d 0 -a 99 -f ASCII -m 386 -p ocr/ -i text.pnm
Doskias: "Watch your tongue boy.  I am the direct descendant of Marduk, son of
the Creator.  It is my destiny to fulfill his prophesy!  If I have to step over your
corpse to do so, like I did your father's, so be it..."
In this way, it'll rapidly learn all the letters of the game's font, until it can process entire updates at once without your intervention.
Finally, here's the complete bash script I use to extract text from an entire update's worth of images:
#!/bin/bash
# :mode=bash:

# do the actual text extraction on a single image
# the command line is as given in the post; it then filters it through a lua
# script that turns newlines into spaces, so that one line in the file == one
# image, and appends it to latest/dialogue.txt
function ocr() {
    gocr -d 0 -a 99 -f ASCII -m $((256+128+2)) -p ocr/ \
        -i <(convert -crop 640x96+0+384 -negate -level 60%,61% $ss pnm:-) \
        | lua -e 'buf = io.read "*a"; print(( buf:gsub("\n", " ") ))' \
        >> latest/dialogue.txt
}

# create latest/dialogue.txt, and if it was already created, empty it
> latest/dialogue.txt

# loop over all the screenshots in the latest update
for ss in latest/raw/*.png; do
    # 'hasface' is a seperate script that checks to see if an image contains
    # dialogue portraits. I can post that too if anyone's interested.
    if hasface l $ss || hasface r $ss; then
        ocr $ss
    fi
done